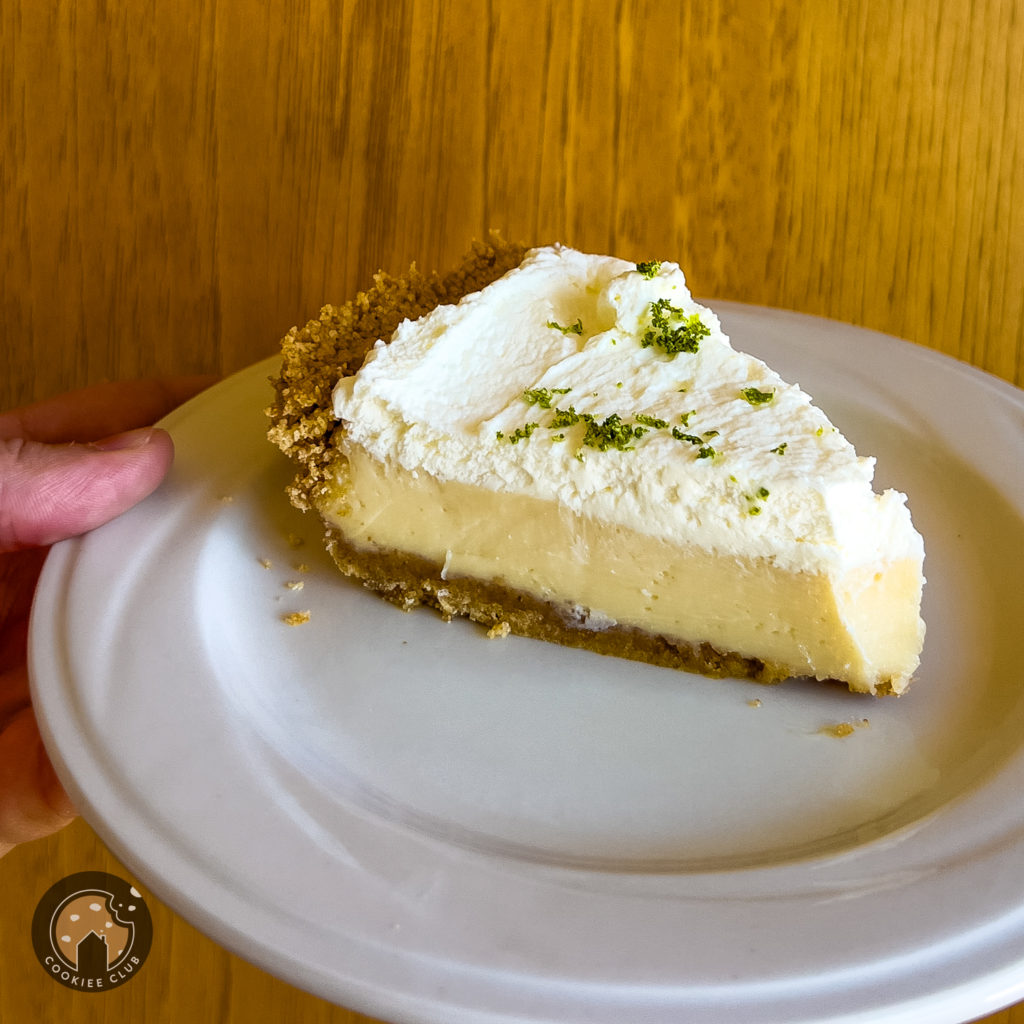
This Easy Key Lime Pie is made with just three simple ingredients sweetened condensed milk, Greek yogurt, and fresh lime juice and baked in a buttery homemade graham cracker crust. It’s topped with fresh whipped cream and a touch of lime zest for a refreshing finish. Not too tart, not too sweet. Just the perfect balance of creamy, tangy, and smooth. A crowd pleasing dessert for any occasion! That is no fail tested.
This post contains affiliate links and I may receive a commission on your purchase. Thank you for shopping through my links.
5 reasons why you will love this recipe
- Simplicity: Only 3 main ingredients in the filling. It makes it incredibly easy and approachable for any home baker. Minimal prep time and no complicated steps.
- Perfect Flavor Balance: It’s not overly citrusy. Just the right mix of sweet, tangy, and creamy, making it appealing even to those who don’t usually love tart desserts.
- Homemade Touch: The buttery graham cracker crust adds a rustic, homemade feel that’s more satisfying than store-bought. Fresh whipped cream and lime zest give it a light, refreshing finish.
- It’s perfect for any occasion: summer BBQs, holiday pies, dinner parties, or a casual weekend treat. Easy to make ahead, and it stores well in the fridge.
- Healthier Twist: Using Greek yogurt adds a protein boost and makes it slightly lighter than traditional recipes with heavy cream or egg yolks.
History of Key Lime Pie
Key lime pie has a flavorful history rooted in the Florida Keys, particularly Key West, where it originated in the late 19th to early 20th century. Before modern refrigeration, fresh milk and eggs were hard to store in the Florida heat. However, canned sweetened condensed milk, invented in the mid-1800s was shelf-stable and widely used. Locals began mixing it with Key lime juice and sometimes egg yolks to create a rich, tangy filling that didn’t require baking (the acidity of the lime juice helped thicken the mixture). Originally, the pie was not baked just chilled. Baking became common later as food safety practices improved and recipes began including eggs. Key lime pie remains iconic because it is simple yet flavorful.
Necessary Kitchen Tools
- 9-inch Pie Pan for baking the graham cracker crust and holding the custard filling.
- Food Processor (or zip-top bag + rolling pin) to crush graham crackers into fine crumbs. A rolling pin and bag work in a pinch.
- Mixing Bowls (1 large, 1 medium) for combining crust ingredients and mixing the filling.
- Measuring Cups & Spoons for Food Scale for accurate amounts of butter, lime juice, and other ingredients.
- Citrus Juicer to easily juice fresh limes, lemons, or other citrus fruits.
- Microplane or Fine Grater for zesting limes or other citrus for garnish.
- Hand Mixer or Whisk to mix the custard until smooth and whip the cream topping to stiff peaks.
- Spatula for scraping down bowls and smoothing the filling and whipped cream.
- Measuring Cup with Flat Bottom great for pressing the crust evenly into the pie pan.
- Plastic Wrap to cover the pie while it chills in the fridge if you don’t have a pie lid.
- Refrigerator for setting the pie properly before serving.
How to make Key Lime Pie (Step by Step)
Preheat the oven to 350°F. Pulse graham crackers in a food processor until coarse, then mix with melted butter and sea salt. Press into a 9-inch pie pan and bake for 6 minutes. Let cool slightly.
In a bowl, whisk together sweetened condensed milk, Greek yogurt, and the juice of 11 limes until smooth. Pour into the crust and bake for 10–12 minutes, until just set. Cool on the counter for 1 hour, then cover and refrigerate for at least 4 hours (or overnight).
Before serving, whip heavy cream with powdered sugar or maple syrup to stiff peaks. Spread over the chilled pie, top with lime zest, slice, and enjoy!
Recipe Variations
Not into lime?
No problem! This pie works beautifully with other citrus fruits. Simply replace the lime juice with ¾ cup of freshly squeezed lemon, orange, or grapefruit juice, depending on your preference. Garnish with the zest of the fruit you chose for a bright and fragrant finish.
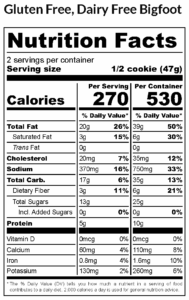
Gluten-Free Option
Swap regular graham crackers with gluten-free graham crackers. I love using Simple Mills Honey Cinnamon Thins for the best texture and flavor. Tap here to purchase!
Dairy-Free Key Lime Pie
To make this pie dairy-free: Use sweetened condensed coconut milk instead of regular condensed milk. Substitute the Greek yogurt with coconut milk yogurt—I recommend Cocojune for its smooth texture. Replace heavy cream in the topping with full-fat coconut cream.

Easy 3-Ingredient Key Lime Pie (No-Fail Recipe)
Ingredients
Equipment
Method
- Preheat the oven to 350 degrees F.
- Add graham cracker sheets to a food processor and pulse until coarse crumbs form.
- Add in melted butter and a pinch of sea salt. Pulse or stir until well combined.
- Pour the mixture into a 9-inch pie pan, then use the bottom of a measuring cup to press the crumbs evenly across the bottom and up the sides of the pan.
- Bake the crust for 6 minutes, until aromatic and lightly golden.
- Remove from the oven and let cool slightly while you prepare the filling.
- In a large mixing bowl, combine 1 can sweetened condensed milk, Greek yogurt and the juice of 11 fresh limes
- Mix until completely smooth—I like to use a hand mixer here for ease.
- Pour the filling into your partially cooled graham cracker crust.
- Bake at 350°F for 10–12 minutes, or until the custard is set to the touch (it should no longer jiggle in the center).
- Remove from the oven and let the pie cool on the counter for about 1 hour.
- Gently press a piece of plastic wrap directly onto the surface of the pie, then refrigerate for at least 4 hours—overnight is best for a clean slice and full flavor.
- Make homemade whipped cream by beating heavy cream with a little powdered sugar or pure maple syrup until stiff peaks form.
- Spread the whipped cream generously over the chilled pie.
- Garnish with fresh lime zest for that vibrant, citrusy finish.
- Slice and serve—the wait is finally over, and your perfect bite is ready!
- Store leftovers in the refrigerator for up to 7 days. Cover with plastic wrap if you do not have a pie pan lid.
Notes
- Chill a can of coconut cream (not coconut milk) in the refrigerator overnight, along with a mixing bowl.
- The next day, open the can and scoop only the thick, solidified cream into the chilled bowl—leave any liquid behind.
- Add 2 tablespoons of powdered sugar or 1 tablespoon of pure maple syrup, depending on your sweetness preference.
- Using a hand mixer, whip the cream to stiff peaks, about 1–2 minutes.
- Avoid over-mixing, as the cream can separate.
- Use immediately to top your pie or keep chilled for up to 24 hours.
Other posts
Tomato Soup & Sourdough Grilled Cheese
I wanted to take a moment to express how much I appreciated reading this article!
You’ve shared such valuable and timely information, especially
for those of us who are dedicated about taking care of
our health. It’s always refreshing to find content that not only teaches but also inspires
healthier habits in such an clear way. I’m definitely coming
back to this and will be referencing your article on my own blog about diets and healthy eating.
Keep up the great work – your content is making a real difference
Oh my goodness, your words made me emotional. Thank you so much for appreciating the time and effort I put into my recipes and my posts to help you and others enjoy eating all the things you love but with healthier ingredient choices. I can’t even put into words how much your comment means to me. I can’t wait for you to try other recipes.